Saturday, December 7, 2013

Foment a Ferment, the Lazy Cider-Punk's Guide

Bubble bubble, no toil, no trouble.

For years, I've wanted to make hard cider, but never have enough apples at once for it to be worthwhile. I always give the tree's owner a good share, and maybe some to friends and neighbors, but basically the girls and I drink it as fast as we make it. Despite a particularly generous neighbor this year, it was the same story.

Once you press the cider, you end up with a "cheese," the wheel of spent pomace, apples chewed by the mill and crushed dry by the press. In the past, this went onto the worm heap, but this time my inner cheapskate devised another step in the cycle.

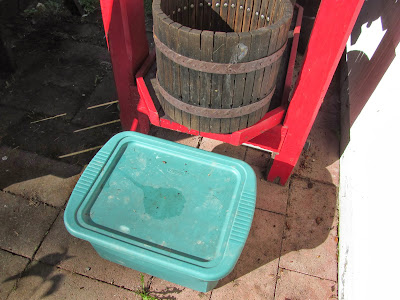
I dumped some pomace into a bin, and filled it with water, on the theory that I could coax forth more sugar and get a ferment going that would yield some vinegar. Just a plain plastic bin, sprayed out with a hose, duct tape over two openings that the fruit flies would have entered. Snap on the lid and walk away.


Being shiftless and lazy, I did not keep notes, but fuzzy recollection tells me that fermentation set in quickly, and it was not long until it was frothy. Yeast was gobbling sugar and pumping out alcohol. I shut the lid and walked away for another undetermined amount of time, checking progress intermittently, satisfied that the fermentation gases were escaping, but fruit flies were not getting in.

At some point, the fermentation slowed, and I decided to jettison the fruit. I strained out the liquid and then put the pulp into a canning kettle, pushing it down with the circular wooden plunger from the cider press to squeeze out the last liquid. Then, finally, I let go of the pomace and the fruit flies and worms got their feast on.


This liquid was then covered for the final ferment, turning alcohol into vinegar. Because I'd just let the wild microbes do what they wanted, and maybe also because this was a second pressing, I doubt the liquid was ever really what you would call hard cider. The vinegar smell was present early on, as the Acetobacteria drank alcohol and pissed vinegar. By this time, I had not only apple, but also pear and plum batches a-brewing.

The pear juice was thick and viscous, a syrupy consistency that I hoped translated to sugar. There was more than half a bin of this as I snapped the lid shut and walked away. The times between lifting the lid and checking grew longer, and between stirring even longer. There were some more bubbles, but not as many, as fermentation mellowed and aging began. Meanwhile, the bin sat just under the eaves of the house, getting afternoon sun when it shone, getting cold at night, pretty much neglected. The whole process, I figured, was a very low-stakes gamble. Rather than invest time and effort, what would happen if I let nature take it's course?

Good things, it turns out. A little more than two months after putting the batches in dark places to do their thing, I pulled the bacterial mat off the surface to reveal liquid that was less cloudy than before and much less viscous. It smelled like vinegar, and tasted like it.

Now, I have a quart of plum vinegar, which seems really fine, but I am continuing to age in the fridge. There's a gallon or so of apple, which seems to be fairly weak and clear; I have not tasted it yet, but even if it's not flavorific, I can use it for the 1001 non-food functions of acetic acid. Finally, I have several gallons of pear vinegar, which is pretty good. I pasteurized some (150 degrees for 35 minutes) and bottled it in re-used beer bottles that I boiled for 10 minutes. I just used the regular crown caps like beer, but will seal it with wax if I get around to it. It will be interesting to see how these age. The live stuff is in a big jug out in the garage and a few half-gallon growlers (again, thank you, beer containers) in the fridge.

Already, some of the vinegar has been put to use. Some went to scrubbing down a moldy molding (acetic acid kills mold without killing me), and some went into salad dressing that adorned the last lettuce of the year. Next Summer, I should be able to make pickles using my own vinegar. The frugal, off-the-grid, lazy, and independent parts of me rejoice. Wringing vinegar from spent cider-fruit adds another spoke to the re-cycle.
Wednesday, September 11, 2013

Alliums, Yummy Allies

Gene, holding Shallots.

Real life has once again intervened with posting here, and all I have is old news.

Last fall, I planted some red onions and vari-colored garlicks, and in the spring I transplanted and new-planted more of their kin. Throughout the seasons, my right finger would poke dirt so the left hand could deposit a slippery stub, bulbish-headed root-end of a scallion stir-fried or otherwise-et the day before, it's promise of free food affording it a place in the garden as I made my way compost-ward with the dross-veg. I cannot swear when I planted the Shalits, except that it may have been later than the Orthodox Fall-Planting school and earlier than the Rebel Spring-Planting outpost. Or maybe not.

It was what this immigrant thinks of as maybe a typical 20th Century Spring and Summer here in the South Sound, and all alliums seemed to thrive. True, the scallions do nothing but grow into gianter, tougher scallions, and the red onions succumbed to neglect (including the outright abuse of a summertime transplant), and of course there was the sheer scapelessness of the 2013 Summer. But the scallions did get ginormous and  the shallits [yes, I'm doing the Lewis-and-Clark thing of spelling a word diffrintly all-the-damn Time] grew fast and strong.

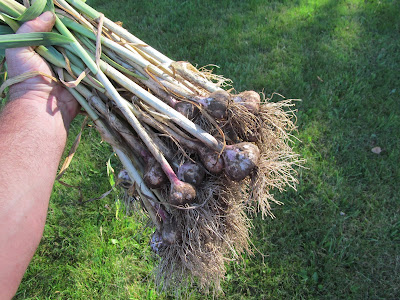
Cogniscenti gardeners will see from the photo that I scooped up the shallottes a bit early--shoulda let the tops die back more--but the haul was good. Same with garlic. See?

Garlic, Me.


Anyway, it was a good year for alliums. I have enough garlic to keep me happy for another year, and a pretty good haul of shallots.

Saturday, August 10, 2013

One Potato, Two Potato, Three Potato, More


2013 was the first year I really made an effort to grow potatoes, and it paid off...or I was lucky. Now that I've harvested 2 of 3 varieties (I grew Ozettes by choice, as well as some Redskins and Yukon Golds because I didn't eat them in time), the experience is ripe enough to jot down some lessons. I've already posted about taters over at Mocavore, but here's where the gardening info will show.

Instead of buying seed potatoes this year, I just grew surplus food. The Ozettes came from Rising River Farm at the Olympia Farmers Market; I bought them in late fall and stored them in a shoebox in the garage. The others were probably from the supermarket, and I planted them because they were getting soft and sprouty at the right time. Lesson: As long as you keep an eye out for blight, you don't need to buy something labeled "seed potato."

In Olympia as in much of the country, St. Patrick's Day is a good time to plant potatoes, and I did put in the bulk of the crop around them. I tried some in February, tucked up against the sunrise side of the house, but it did not result in a head start on harvest. They're still in the ground, which I think is pretty poor to begin with and was negelected in terms of both fertilizer (none) and water (under the eaves, so not much rain, and I didn't really water). Lesson: Starting early may not hurt, but it doesn't seem to help, either.

The soil here is a sandy loam, which makes it easy to work, it drains well enough that the tubers won't rot, and there are not a bunch of rocks to get in the way and deform the potatoes. On the other hand, it's not very rich in nutrients, so I augmented it a bit. When I dug the bed and prepped it in January, I added bone and blood meal (didn't record the amounts, but less than 2 pounds on a 25-foot by 3-foot bed, as well as wood ash. How much this had to do with the rampant growth that followed I cannot say, this being my first crop on this ground (which was lawn for decades before). Lesson: Sandy soil may be great as a growing medium, but it probably needs some food; adding fertilizer a month or two before planting seems to have helped.


So yeah, growth took off  like crazy, but the plants didn't get too leggy, except for the Yukons, which were planted in a much shadier spot, and which at this point have vines nearly 6 feet long, sprawling all over the place. I hilled everything a couple of times, but contrary to mythology I've heard time and again, but at harvest time it appeared that a second hilling did not create a second round of tuber formation. Even when the plants were growing, and I still harbored the belief that another round of hilling would produce another round of potatoes, I held off on a third attempt, deciding to let the plants focus on fattening up the existing tubers. Lesson: You do need to give your tubers some protection and room to grow, but continuing to hill them up does not seem to give you a bigger crop, and only makes the potatoes harder to get at.

By July, the main potato row was yellowing a bit, and the rapid growth had stopped. Based on pretty much nothing more than a hunch, I figured that potatoes are a little like taro in this respect, with the rate of vegetative growth following something like a bell curve--a slow start, a vigorous middle age, and then decline. Working from little more than superstition, I like to let the decline take its course, as if the strength of the stems and leaves is draining back down and collecting in the tubers. At the end of July, with the tops partially drained, but not yet dessicated skeletons, I started harvest. Having controlled by urge to graffle, I got the whole crop at once. From a 25-foot row, roughly 2/3 in Ozettes and the rest in Redskins, I got a half bushel of the former and maybe 2 pecks of the latter. Looked at another way, each potato I planted turned into several pounds of potatoes that I can eat. Lesson: One row is only a long-term supply if you are on a low-carb diet, but it's a pretty good return on the minimal investment. Also, one of the things that makes gardening fun is that it give me an excuse to use what are otherwise archaic units of measurements--I can hear my grandparents saying those words.


Somewhere along the line, I've heard that you should let potatoes dry out for a little while without washing off the dirt (it being so sandy, not much stuck on anyway), and since this approach appeals both to my love of loam and loathing of extra work, that's what I did. In fact, a couple of weeks later, the Ozettes are sitting in my archaeology screens, which consist of a 4-inch deep frame with 1/4 or 1/8-inch mesh. They're plenty dried off now, and I suppose it's about time to put them in the dark, or maybe hang them up in one of those coffee shipping bags I've been saving. Lesson: Being an archaeologist has its advantages when it comes to harvest time.

The earliest Ozettes and most of the Yukon Golds are still in the ground, and I'm inclined to leave them there for as long as I can. Sandy soil is good storage, and until winter rains saturate the ground, they'll be fine. A holdout Russet from the previous tenant's garden did this, and put out it's own surprise crop this year, maybe a half peck from one plant. Lesson: No need to harvest everything at once; it's more work, and just creates storage issues. In fact, maybe with the remaining ones, I'll just graffle all but a few, and see if they produce and even lower-labor crop next year.

That exeriment will take a while to play out, but looking back at this year, I'm pretty happy. At $2/pound for good varieties of organic potatoes at the Farmers Market, it's not like I've saved a huge amount of money, but I did get enough for a bunch of meals. Being able to put them in in March and pull them a month or so after the Solstice also means that I can grow a Fall crop in their place, and in fact there are already radishes, beets, carrots and kale coming up where the potatoes came out. Because they start fairly early, and hilling happens later on, potatoes work well with the approach of having beds that expand as the season progresses (as in the Tidal Beds post). Lesson: The tater has a place in my garden.

Sunday, July 21, 2013

Heap o Worms - Update

Stick a fork in it; it's done. (Guardian caiman at left.)

Earlier this year, I wrote about how I abandoned the bin, and experimented with freestyle vermiposting. Having had a wooden bin that succumbed to rat raids or some unknown catastrophe, I just started tossing kitchen scraps and the neighbor's juice-machine pulp in a heap, aiming for an old-school compost, but thwarted by the cool wet NW winter. Then I noticed that worms migrated in, and the compost was just not heating up, so I took to tossing on dirt from molehills to aid the vermiferous digestive process, and turning it all with a fork from time to time.

Even in January, it seemed to be working just fine. I never added worms, but there they were. No idea whether they were heeding the dinner bell and crawling in from elsewhere, or if I had a breeding population, but each time I turned over the heap, scads of red wriggling worms appeared. The color and activity makes me think they are "red wigglers," the favored variety for composting, but again, I have no idea if that's true; my curiosity tends to take a nap when things are working fine (unlike those missing scapes, what the hell?).

On the initial worm heap, I would put fresh material on one side, followed with some brown matter (dead leaves and twigs, mostly, the idea being to get some partially decomposed material with it's microbiota to balance the fresh "green" stuff), finally dusted with some soil (I mostly used backdirt from molehills, which around here is the glacially deposited, mostly inorganic, sandy clay substrate). Then I'd flip the other side on top. Back and forth.

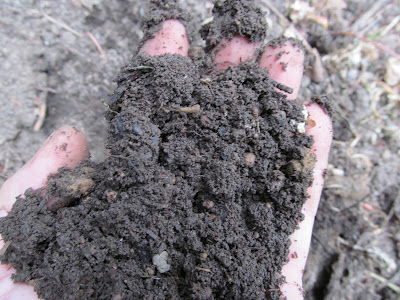
That worked fine. Yielding this:

Heap #1, cross section.


So yeah. Update: It worked. A few months turned all my kitchen waste and the neigbor's juice pulp into fine black loam. Because of the addition of sandy soil, it actually has more structure than typical worm castings, although it may not be quite so potent. Better yet, the soil for a couple of feet around the heap is spongy-soft; even after I harvest the good stuff, the network of worm-tunnels full o castings will make this a good spot to garden.

Hell yeah, I'll take that.
 
In May, I stopped adding material to Worm Heap #1, figuring I'd let the worms work their way through the last of the fresh scraps and make for a harvest that had only the good stuff (and presumably, fewer worms, wh would have moved on in search of food.

The new heap took shape about 10 yards away, beginning with a layer of dead leaves, poplar and spruce buds (thank you, windfall), and whatever. By now, my juice-fiend neighbor was keeping his pulp to himself, but it being Spring now, there was a supply of garden thinnings.

Heap # 2, cross section.

To augment the thinnings, I also tossed on weeds, unless they were the kind that would take root too easily, or were full of seed.

As if haphazard weed-tossing is not lazy enough, I decided this time to forego the periodic turning with a pitchfork. Not having giant clumps of carrot-pulp that need aerating to prevent slimy non-decomposition, it didn't seem so crucial, and an experiment in the name of finding an easier way is one gamble I'll usually take.

So far, so good. With drier weather, I pay a bit more attention to watering the heap, but no turning. After adding a decent amount of green material, I'll rake the garden paths toward the heap to give it an influx of brown matter, or shovel on some molehill dirt. Not quite so systematic, but still there is a good mix of green, brown, and grit. Maybe not as pretty as Heap #1, and to the untrained eye it may appear haphazard, but if it works, it's a refinement of technique from the standpoint of energy input (according to my back). More to the point, the worms are there in droves, and the green and brown stuff is turning into dirt.

Toss it, and they will come.

Maybe I'll do another update, but if not, just assume this is working. At this point, I cannot see the sense in trying real composting again. Or even making another worm bin. I have yet to sort Heap #1 (I'll sift it through 1/2-inch mesh to remove the sticks and avocado pits, which are apparently indestructable), but there must be at least 20 gallons of black gold there, and I should be able to do this twice a year. The sandy glacial soil in this yard should improve.

Ex Scape

Weird, but this 5th year of growing garlic in the Northwest, and for the first time it did not put out scapes. Planted in October, and we probably had the most normal year of the past few, but May and June rolled by with almost no scapes.

I thought at first it might have been a nutrition issue--these were in an abandoned garden plot from the previous renters, and I didn't amend the soil heavily (although I do think the garlic got the same dusting of blood and bone meal as the taters)--but an afterthought planting near the house in poorer soil did send out a few scapes.

The garlic itself seems fine, if not particularly large. I saw some other patches that produced scapes, and farmers at the market were selling them, so it's not some Olympia-wide scape famine.

It's a mystery to me. A little sad, because I like chopped scapes (the Garlic Calendar makes a big deal of watching for and making use of them), but more of a teasing enigma than a disaster.

Anybody else have this problem?

Thursday, June 6, 2013

Garden at the end of May


Let's see,...we had the fake Spring of mid-May, and then the week o cool rain, ruining many a Memorial Day plan.

I'll admit that the warm week tricked me into buying a dozen tomato plants (among them every single Paul Robeson I could find and several Marmondes), but at least I had the sense to tuck them into the hoop house, where carrots are also sprouting just fine. On the other hand, the beans planted without cover went into hibernation until yesterday.

Meanwhile, in the next row, Ozette potatoes are growing better than any taters I've ever planted. I've been good to them, prepping the ground with plenty of cultivation and doses of bone meal and wood ash, but not overly solicitous. I've hilled them up, digging into the grass next to them and shaking the dirt free where it could do some good. Mostly, sun and rain have done their job, and the plants look healthy and sturdy. Now, a week into June and back in sunny weather, they are flowering. I could start graffling soon, but will hold off.

"Graffling" is old southern term for reaching into the dirt and feeling around, pulling a few tubers without hurting the plant and stopping the rest of the crop from continuing to grow. There are variants, but this is how I remember Grandma saying it. She was a mischievious and skilled gardener. She might appreciate the random offshoots of my garden more than the neat rows. I wish she were around to enjoy a meal of new potatoes.

Thursday, May 30, 2013

We Are Devonian: The Scouring Rush


Back in the Paleozoic, when the animals were just getting started and plants had the run of the land, just begining to evolve fancy things like roots and seeds, flora like the horsetail were common. In the primeval swamplands of every state in the union, they still are.

Equisetum hyemale, the scouring rush horsetail, is one of those survivors. In pristine wetlands and roadside bar ditches alike, this ancient (way pre-dinosaur, my friends) green shoots up from the mud and then shoots out spores. The stalk segments can be a source of pure water, if you find yourself thirsty in a swamp, but today my interest is in the properties implied by the common name, the Scouring Rush.

Those same hollow segments that hold water are formed of a tough, silica-rich material that turns out to be a fine (in multiple senses of the word) abrasive. Having been around for hundreds of millions of years before humans, it's abrasive power apparent to any creature with a sense of touch, this horsetail had to have been among the first plants used by hominids, smoothing down anything from a hangnail to a bone tool.

This modern hominid, having tried out the scouring rush on carvings where an absolute burlessness and skin-smooth contact is the goal, has learned that this horsetail is one of the finest finishers available. I am pretty sure it beats a 000 steel wool, maybe even 0000.

Rush, clogged with grease.

But it also turns out to be (surprise!) a fine scouring tool. Gotta clean a skillet or wok? You want this. One or two segments and some warm water is all you need. Skudge skraped free, burnt oil and fat stick to the plant. Rub till it feels smoothe, and you are done.

Other than a few decorative plantings in pots and ponds where the landscape architect didn't have to worry about their invasiveness of simply did not know she was dealing with something so ridiculously common as to be free, the scouring rush is there for the taking. This is a species whose gathering will not upset anyone, kinda like nettles. If you have pots to clean, or carvings to polish, grab a few fistfuls. Dry them out (I just put them in a dry vase), and they'll be ready when you need 'em.

Then, compost them. They are literally and figuratively green. They are free. They are so abundant that nobody will complain if you rip them out by the fist-full. 

Monday, March 25, 2013

Open a Heap o Worms


I've never been the best composter, but even so the Northwest is the most difficult place by far that I've ever tried to do it. People talk about it a lot, blogs and newspapers run articles about composting, hell, even the county will subsidize your purchase of a bin. But some of the best gardeners I know, when pressed, will admit that our cool wet Winters (and Falls and Springs--let's be honest) make it a challenge at best. Sure, selectivity of materials, great diligence, and willingness to have multiple composts in the works at any given time can cook up some fine black gold, but it ain't easy.

So a couple of years ago, I figured I'd try worm composting, but again, I was not so good at it. Ultimately, I did not have enough bedding and space to accomodate the volume of kitchen and garden waste I produce. In the meantime, I am pretty sure, rats gobbled up many of the specially purchased red wiggler worms alleged to be master casters (although I've had no luck to date finding reliable information on vermipredation).

Now I live alone, and don't have as many daily food scraps, but since I press cider, pickle, and can in bursts, I produce occasional heaps of peels and pulp. Add to this a helpful neighbor who makes a lot of juice and gifts me with bins of finely ground veggie and fruit every week or so, and I have so much fresh material that any compost or worm bin is bound to be overwhelmed.

Until I gave up. 

At least, I stopped trying to go the usual routes, like paying for special worms or compost bins. Taking the DIY ethic to it's sometimes backbreaking and stubborn extreme, I resolved to make due with the tools, soil, and critters I have. 

Over the carrot and kale pulp, a layer of old leaves.
I pushed my failed compost into a heap. The humble heap (a word of Anglo-Saxon origin, more faithful to the spirit of a shapeless mass of rotting vegetables than the Latin-derived "pile," which is a bit too prissy and upright for what this is). Somehow I got it into my head that I could coax the local earthworms up into it. The up-side of our cool wet climate is that it is rarely outright freezing, and worms are often close to the surface throughout Winter. In fact, I knew from my compost failures over the years that they would migrate into a heap if it weren't burning up at proper compost temperatures. [You may not be a big worm fan, but they probably beat my similar cannot-compost-adaptation/rationalization involving rats.]

So I decided to set the table a bit more to their liking. When I go on a cooking binge, or the juicaholic neighbor has one of his own, the debris goes on half the heap, as in the opening photo. Then I scrounge up some old dead leaves for variety and anti-bird cover, and toss them on, like in the second photo. Finally, I layer on some mineral soil. Luckily for me, moles are constantly kicking up backdirt from their endless tunneling under the lawn, and all I have to do is scoop up a few shovels of that nicely broken up soil and toss them on. Like in the last of this most un-photogenic series, here:

Yep, that there's a dirt-covered heap. One of the internet's finest photos.

The dirt is something earthworms like, even need, giving their guts the grit to digest the vegetative matter. According to my reasoning, which lies somewhere between superstitious hunch and scientific hypothesis, the combination of new scraps with old microbe-laden duff and mineral soil should be a balanced meal that lets the worms thrive and make more worms. Lately, as I turn the heap, the number of worms suggests that I am onto something.

Speaking of turning, my hunch/hypothesis is that this is the crucial activity on the part of me, the human steward of this worm mountain. Earthworms are good aerators, but the frequent addition of more fresh vegetable peels and pulp, of wet leaves and often sodden soil, is enough to compact the heap into a stanking anaerobic mess that will never decompose fully. Turning the pile loosens the material, creates new air pockets, and facilitates migration of interior to exterior and vice versa.

This is why, in the first photo, you see carrot pulp on only one side. In a week or so, I'll dig in deep to the other side with the fork, and turn it over on top of the left before depositing a new load of scraps, leaves, and soil onto the right. If I see any slimy clumps, I'll break them up. Maybe toss on more leaves or soil, or just pull out a few twigs; I respond to the moment. In time lapse photography, you would see the heap shift from one side to the other. 

This hypothesis/hunch has yet to run through the test. The look and smell of the heap, not to mention the burgeoning worm population, suggest it is working. As time passes, I imagine that I'll be able to harvest shovel-fuls of fertile dirt-compost-castings, as the pile continues its slow swaying dance and the worms shimmy inside. I may set up a half-inch screen box nearby and harvest the fine fallout that way, tossing the rest back into the pile. Or maybe, some other idea will occur to me. In the meantime, I toss dinner scraps on every day or so, a pile of pulp every week or so, and engage in a burst of heavy labor now and then. And the worms eat and make more worms.

[Oh yeah, it worked great! See the Update, and Round 2 experiment here.] 

Sunday, February 24, 2013

Toeing the Line


February is time to dig. The frost has only reached skin deep this year, and the rain rain has stayed away to come again some other day. This perfect non-storm afforded me the opportunity to dig, shake and rake. I dig up some sod, shake off whatever topsoil and worms I can (most of 'em, when to soil is not saturated), and use my grandma's long-handled garden rake to get the beds ready.

My maternal grandma, whose rake I think this is, was more unruly than row-ly. Like her, I plant haphazardly, tucking things in here and there. But a true chaotic high note takes some time to achieve, and being on rented land (owned by someone I have reason to believ would not appreciate random island of plants in his lawn), I've gone for a more orderly, rectilinear garden layout this year.

Ergo the row-beds and rectangles that comprise my garden this year. The ones pictured above (wide one is for a hoophouse full o' tomatoes, other one for taters and pole beans), and a strip along the house's eastern front for snap peas, the early potatoes and various herbs and flowers. Oh, and another rectangle in the far back where there is sun in the morning and again in the later afternoon, when rays sneak in beneath the neighbor's trees. 

Planting has begun--early taters and snap peas in the sundrenched east, poppies and the first lettuce and radishes wherever--but February is mostly about getting ready. Dig the bed. Apply gore (blood and bone meal).

The linear beds will flow and then ebb, and probably become a grassless mass by Summer's end. If this became my place for more than a year, a piece of ground I could count on long-term, the lines would meander, the rectangles would chaoticize. But however anarchic my gardening may be(come), however prone I am to planting hither and yon like my grandma, a Year 1 garden looks tamer, rowed, and conventional.


Sunday, February 3, 2013

Garlic year: Sprouts, Procrastination, and Loving Your Volunteers.

Everything's tilted but the garlic.

Here it is the first week of February, and the tentative sprouts of January are already nearly a brick-width high. These were planted in October (barely) in accordance with (barely) The Year According to Garlic Calendar. Blanched tips were visible weeks ago, but now the Sprouts are well on their way to Shoots, the almost-halfway-to-Equinox sun tempting chloroplasts into action. Stand back and enjoy.


Meanwhile, those few cloves not already et, dried, salted, or drowned in olive oil are impatient with waiting, and haved decided to grow now. Mostly, these are the center cloves of large softneck garlic (Inchelium? Music? I stopped keeping track years ago.) that were already getting spongy a month or so ago when I was putting up the crop. These were the impatient individuals of their respective knobs, itching to sprout and grow as soon as the Solstice passed, and hence past their prime by the time I got around to preserving.

As is my wont, I procrastinated on the planting as well. They could have gone in my Puget Lowlands ground a month ago, but an additional month of delay--no, outright neglect, tossed on a side counter in the kitchen without even the benefit of decent light--is my bow to evolution. Or more precisely, selection. A month gives mold and rot a chance to attack, and forces the malingerers and weaklings to show themselves. Maybe they would not die, but I would kill them (in soup or fried with onions and sausage, if they grew not into blue  fuzzy mold-bombs), and plant only their virogorous sistren.

OK, I admit it, this picture is from October. There are no green poplar leaves on the ground now.

And so today, at long last, I poked holes in the ground and dropped in the sprouting cloves. Yes, you are supposed to plant in the Fall. No, I won't regret this come Summer when I am getting big-ass bulbs of garlic from this procrastinatory planting. 

Meanwhile, back at your ranch, check and see what's sprouting this month. The forgotten and ungarvested garlic will be popping up, and you can uproot and split these heads into cloves and re-plant if you want. Sure, it's not what the books tell you to do, and it may not be optimal, but as long as you have any space to spare, it's better than letting them cram together and produce nothing, and way better than pulling and tossing them out. Let the volunteers know they are loved, give them room to grow, and your nurturing will be repaid.

Saturday, January 19, 2013

New Ground: Making a New Garden Bed


To begin with the end, a sunken raised bed, canted to the sun.


 2012 was a rough year in many ways, including gardening, but the world did not come to an end, and so another garden begins. Only a mile north of the last one, and in the same sandy loam glacial outwash soil, it's basically in the same ground. The main difference is that there is less shade, and should work out better for growing food.

With several days of rainlessness and the earth not frozen, I went out and started a new bed. I've explained before why I don't go for raised beds penned in by boards or stone, and attempted to explain why a sunken raised bed works better, but this post dispenses with the arguments and gets to work. Read on to learn how to start a garden bed and harvest some sod in the process.

10 AM. Ignore the row for beans at the right; the new bed is just a few lines cut through the sod at this point.
This yard has the advantage of a solid half day of sun, level ground, and not a bunch of trees or shrubs in the way, but the distribution of lawn is not what I'd like. The best garden spot is covered in grass, and an area where I'd like some grass is bare. So one objective here is to redistribute some sod. I know, redistribution is a dirty word to free market folks, but I am an unrepentant sodcialist. 

To harvest some sod means that just ripping away is not the way to go, and so I adjusted how I start the garden bed to yield pieces a bit over a foot wide, with enough roots to survive. The diagram below gives an idea of the sequence. 


The bed may expand later, but for now it's 25 feet long and 3 wide, and this image is looking end-on. First, I take the shovel and cut four lines down the length of the bed, as deep as the blade will go. Then, I take a pickax and peel back sod from the center section, cutting mats of sod about 18 inches square. If you want more, skip the middle two cuts and peel off the entire surface. Take the time to yank dandelions free as you harvest the sod; this job will never be easier.


As the green peels away, shake free some of the topsoil and earthworms (grass does not need them the way your garden does). I also chunk out some fo the soil beneath with the pickax to loosen it up, but because the soil is not too clayey and I hate cutting worms to pieces, I don't work too hard at it and this middle section is not cultivated as deeply as the side sections will be.

Speaking of which, the digging on the sides is done, and after you've skinned whatever sod you want, the work consists of shaking soil (and more worms!) free of the grass. I try and keep dirt toward the center of the bed. The grass will go in a heap in a shady part of the yard to slowly rot, or become a berm, or whatever. I am a miser when it comes to organic material, and will not put it, weedy as it may be, in a city greenwaste bin. In my old yard, I piled years' worth of grass by the fence, and eventually it became a berm where I planted berries.


2 PM. Done, with a side of sod.
At this point, all that's left is to go through with a garden rake. Lap after lap, I work up one side and down the other. First, the aim is to break up clumps of soil and remove roots and grass. Then, the job is sculpting the earth. I keep a bit of ditch on either side, and slope the bed surface down to the south to gain a few degrees advantage in soaking up sun. 

Blessed with nice easy soil, no rocks, and no freeze, the whole process took no more than 4 hours. The result is a bed the length of one soaker hose, amenable to making a hoop house (how? look here), and ready for planting. I'll probably toss in some early greens just to make use of the ground, but later in the spring, I'm pretty sure this will be the tomato bed. It may get wider to accomodate carrots or somethign else that doesn't need hoop house cover, or it may just stay the way it is. That's the beauty of working with this soil and not boxing myself in with a raised bed.

Tuesday, January 8, 2013

Recycled Christmas Tree Post


Every year before Christmas, newsrooms in cruise mode revive the great Real Tree vs Plastic Tree debate. Every year as Hannukah kicks off, my college room-mate attempts to understand why so many goy insist on killing a fir tree every year. After all, Jesus only killed a fig tree (Matthew 21:18-22), and didn't do it again every year.

In terms of appeal, fake trees win only among the extremely fastidious and the lazy, for whom cleaning up a few needles is too much of an imposition, so the articles in recent years have often focused on the environmental aspect of the debate. Initially, the ersatz Tannenaum contingent had the upper hand, asserting that cutting a tree down every year damaged forests, whereas plastic trees last forever. 


But nearly all live (then dead) trees now come from farms like this one, just outside of Olympia. People like me come and cut trees, and the farmer plants more. A recent study shows that if the tree farmers don't kill the groundcover plants between trees, such farms are good for carbon sequestration--not as good as a forest, but still significantly better than fields of annual crops or pasture lands (and bonus: no cattle farts), which is what most Christmas tree farms were previously.

In my case--recognizing that this will not be true in all parts of the country--there's the added benefit that the round trip to get the tree consumed less than a gallon of gas. Plus, I'm supporting the local economy, helping a farmer make ends meet, and helping forestall the loss of farmland to development. Because this is an ongoing operation, new trees replacing old every year, it's a relatively stable habitat for birds, deer, and other critters that like something between grassland and forest. No, it's not pristine, but it has some ecological value, and it beats the hell out of a lot of the alternatives.

Meanwhile, fake trees are made of petrochemicals and metal ripped from the earth, processed in factories that consume more oil and create toxic waste, packaged in cardboard boxes (killing trees! the horror) and more plastic, and shipped from China the trucked to your locality. The carbon footprint is large, and the sequestration value zero. If these trees lasted forever, the footprint might be amortized, but fake trees make their way into landfills, not from generation to generation. 

[A Digression: The same goes for ornaments on the tree. If you are stingy and nostalgic like I was this year, then you have ornaments that have somehow stayed out of landfills for decades. A bunch are made from Christmas cards and chicken pot pie tins recycled when I was in second grade, waylaid from the waste stream for twoscore years.] 

All this should be famliar to those of you who reard or read reports on the Real vs Fake theme before Christmas, but what about after? Fake ones go back in a box or into the garbage, so making them less environmentally harmful is a matter of holding on for as long as possible before trashing them.

For real trees, the environmental impact can vary a lot depending on what you do after the holidays. At one end of the spectrum, you  could burn it. Torching a dry fir can be a great show, but it exhales the carbon it breathed in from the atmosphere for years right back into the air in a few minutes. You could douse the flame before it consumes the wood and bury the charcoal, in which case the carbon could stick around for tens of thousands of years. 

Many counties and municipalities have programs to mulch Christmas trees. Olympia even comes around to pick them up. The chipped trees become mulch in parks and in some cases may be sold or given to citizens; this extends the useful life of the tree, provides a local source of mulch with a lower cost and fuel use, and ends up in the soil. Sequestration time varies depending on conditions and from needle to branch to bole, but again something is better than nothing, and the breakdown feeds soil microbes, fungi, arthropods, and so on--it is carbon recycling, not emission. 

I'm stingy with biomass, and would no sooner give the city my tree than I would my compost. At some point in January, I take the tree outside, stand and all. This being the maritime Northwest, it can stay there looking green and alive until April or May, and in years past I have placed to to seem like part of the landscaping. Some years, as Spring comes round, I cut off the boughs and lay them among the blueberries as a nice acidic mulch; I may come back the next year and toss the skeletal branches aside. The trunk gets tossed in back for the native blackberries to clamber over, and eventually to return to the soil. Other years, I remove the stand and toss the whole tree in back. Birds hide in it, berries climb through, and the soil beneath gets better year by year. 

I rationalize habitually, but in this case I really do think that my choice of tree and my treatment of it after the holidays is as good a way to go environmentally as most of the alternatives. A live tree, planted out after Christmas, would be better, but I don't own any ground to plant in, and I don't know many people who have the space to do that year after year. No tree at all could be better, maybe, but it sounds like no fun. Besides, I want my local tree farm to stay in business.

Thursday, January 3, 2013

Garlic Winter


If you tuned into the Garlic Calendar, then you know that the cloves sense the Winter Solstice, and commence to sprouting, threatening your year's supply of homegrown flavor. But I'm such a procrastinator that I cannot follow my own advice, and it was only in the new year that I got around to peeling and storing the dozens of cloves that were sitting in the garage. Just these couple of weeks had the garlic doing this:

Hot hot garlic porn, or just reproduction?

While they're starting on the new cycle that would birth a new plant, the cloves are not yet too far gone (besides, I kinda like the look of slices with the green circle in the center). But before the sprouts get as long as the cloves from which they spring, before the flesh gets soft, before pungent aroma becomes putrid regret, I need to somehow stop the process. In years past, this has been a matter of dropping peeled cloves into a jar and drowning them in olive oil. I did that again, but this time I'm trying a couple of other methods.

Salt and the earth.
Here's experiment #1. Good old fashioned salting. Pour pickling salt into a jar, put in a layer of peeled cloves, then bury them in salt, then more garlic, more salt,...you get the picture. The cloves are firm, and I did not irrigate, so I don't expect osmosis to create a saline slush, but it's an experiment. For reference, the majority of the cloves in the first photo and a bunch of salt filled a pint jar. I'll check back in later to let you know if this is a fail, but I suspect that what will happen is that the cloves stay intact, and I get a batch of garlic salt.

Experiment #2 is yet to be done. I had a bunch of large-cloved heads of garlic this year; some are elephant garlic, but not necessarily all. The plan is to roast them, smoosh the result, spread it out on parchment paper, and dehydrate it. I'm aiming for something like fruit leather, a hide of garlicky goodness that I can snip into strips or drop into the pot whole whenever I want that twice-roasted garlic flava.


And then there's this, the old standby: cloves in oil. Chopped or pureed garlic tastes harsh and goes bad quicker. Drowning while cloves in oil and keeping them out of direct sunlight seems to halt the sprouting process. I'll remove the rubber gasket from the jar above so that the occasional fermentation fart can escape. In time, the cloves will soak up the oil and become beautifully translucent, edible amber. 

There are other ways to preserve garlic, but I don't like them (pickling? I just throw some in the cuke pickles I make, and that's plenty for my taste), or I don't know them. If you want to write in with others, I'll listen.

So if you have not yet dealt with your garlic, do it now!